Arduino Uno R4 WiFi Board: A Complete Guide to Wireless Connectivity
Introduction
The Arduino Uno R4 WiFi board is an innovative development board that combines the power of the Arduino platform with built-in WiFi connectivity. It opens up a world of possibilities for creating Internet of Things (IoT) projects, allowing seamless wireless communication between devices. In this comprehensive guide, we will delve into the features, specifications, and applications of the Arduino Uno R4 WiFi board. Whether you are a hobbyist or a professional, this board offers a versatile and convenient solution for your IoT needs.
Table of Contents
- What is the Arduino Uno R4 WiFi board?
- Features and Specifications
- Getting Started with Arduino Uno R4 WiFi
- Connecting to WiFi Networks
- Creating a WiFi Access Point
- Working with Sensors and Actuators
- Programming the Arduino Uno R4 WiFi
- Powering Options
- Applications of Arduino Uno R4 WiFi
- A new feature in Arduino Uno R4 WiFi Board
- Frequently Asked Questions (FAQs)
- Conclusion
What is the Arduino Uno R4 WiFi board?
The Arduino Uno R4 WiFi board is an enhanced version of the popular Arduino Uno board with integrated WiFi connectivity. It combines the traditional Arduino Uno features with the convenience of wireless communication, making it an ideal choice for IoT projects. With the ability to connect to WiFi networks and create access points, this board enables seamless data transfer and remote control.
Arduino Uno R4 WiFi board Datasheet - click here
 |
| Arduino Uno R4 WiFi board Specifications |
Features and Specifications
The Arduino Uno R4 WiFi board offers several notable features and specifications that make it a powerful tool for IoT development:
WiFi Connectivity - The board is equipped with a built-in WiFi module that supports both 2.4 GHz and 5 GHz bands, ensuring reliable and fast wireless communication.
Microcontroller - It is powered by the ATmega328P microcontroller, providing a familiar environment for Arduino enthusiasts and developers.
I/O Pins - The board features 14 digital input/output pins (6 of which can be used as PWM outputs) and 6 analog input pins, allowing for versatile project configurations.
Compatibility - The Arduino Uno R4 WiFi board maintains compatibility with the vast ecosystem of Arduino shields and accessories, providing endless possibilities for expansion and customization.
Getting Started with Arduino Uno R4 WiFi
 |
| Arduino Uno R4 WiFi board |
Connect the board - Use a USB cable to connect the Arduino Uno R4 WiFi board to your computer. Ensure that the board is properly recognized by the operating system.
Select the board and port - Launch the Arduino IDE and select the appropriate board (Arduino Uno WiFi Rev2) from the "Tools" menu. Choose the correct port to establish communication with the board.
Upload a sample sketch - To verify the setup, select a simple example sketch (e.g., Blink) from the "File" menu and upload it to the board. The onboard LED should start blinking if everything is configured correctly.
Connecting to WiFi Networks
The Arduino Uno R4 WiFi board offers the flexibility to connect to existing WiFi networks. Follow these steps to establish a wireless connection:
Connect to a network - Use WiFi.begin(ssid, password) function, replacing "ssid" with the network name and "password" with the corresponding password. This initiates the connection process.
Check the connection status - Use the WiFi.status() function to determine whether the board is successfully connected to the WiFi network. If the connection is successful, you can proceed with data transmission or other operations.
Creating a WiFi Access Point
The Arduino Uno R4 WiFi board also allows you to create your own WiFi access point. This is useful when you want to establish direct communication between the board and other devices.
Follow these steps to create an access point:
Set the IP address and subnet mask - Use the WiFi.softAPConfig(local_ip, gateway, subnet) function to configure the IP address, gateway, and subnet mask of the access point.
Enable the access point - Use the WiFi.softAP() function to activate the access point. Other devices can now connect to the access point using the specified credentials.
Working with Sensors and Actuators
The Arduino Uno R4 WiFi board can easily interface with various sensors and actuators, allowing you to create interactive and responsive projects. Whether you want to measure temperature, detect motion, or control motors, the board's versatile I/O pins make it easy to connect and communicate with external devices.
To interface with sensors, connect the appropriate wires or modules to the digital or analog pins of the board. For actuators such as motors or LEDs, use the digital pins to send control signals. By combining these components with the WiFi capabilities of the board, you can create IoT projects that monitor and control the physical world remotely.
Programming the Arduino Uno R4 WiFi
The Arduino Uno R4 WiFi board can be programmed using the Arduino IDE, which provides a user-friendly environment for writing code. The Arduino programming language, based on C/C++, makes it accessible for both beginners and experienced developers.
To program the board, follow these steps
- Open the Arduino IDE and create a new sketch.
- Write your code using the Arduino language syntax.
- Use the built-in functions and libraries provided by Arduino to interact with the board's features and peripherals.
- Upload the code to the Arduino Uno R4 WiFi board by clicking the "Upload" button.
The board will execute the uploaded code, enabling it to perform the desired tasks. Refer to the Arduino documentation and community resources for a wide range of examples, libraries, and tutorials to help you with your projects.
Powering Options
The Arduino Uno R4 WiFi board can be powered in multiple ways, providing flexibility in various scenarios. Here are some common powering options:
- USB Power - The board can be powered directly through the USB connection with a computer or a USB power adapter.
- External Power Supply - Connect a regulated 5V power supply to the board's power jack. Ensure that the supply can provide sufficient current for your project.
- Vin Pin - You can also provide power to the board through the Vin Pin using an external power source (6V to 20V). The board's voltage regulator will regulate it to 5V.
Choose the power option that best suits your project's requirements and availability of power sources.
Applications of Arduino Uno R4 WiFi
The Arduino Uno R4 WiFi board finds applications in various domains due to its versatility and wireless capabilities. Some common applications include:
- Home Automation - Build smart home systems to control lights, appliances, and security devices remotely.
- Environmental Monitoring - Develop weather stations or air quality monitors that transmit data wirelessly to online platforms.
- IoT Prototyping - Create prototypes for IoT projects, allowing devices to communicate and exchange data via WiFi.
- Remote Monitoring - Develop systems for remote monitoring and control of equipment, machinery, or industrial processes.
- Robotics - Use the board's WiFi connectivity to control robots wirelessly and enable communication between multiple robots.
These are just a few examples, and the possibilities are endless. Let your imagination soar and create innovative projects using the Arduino Uno R4 WiFi board.
New Features in the Arduino Uno R4 WiFi Board
The Arduino Uno R4 WiFi board introduces several new features that enhance its functionality and usability.
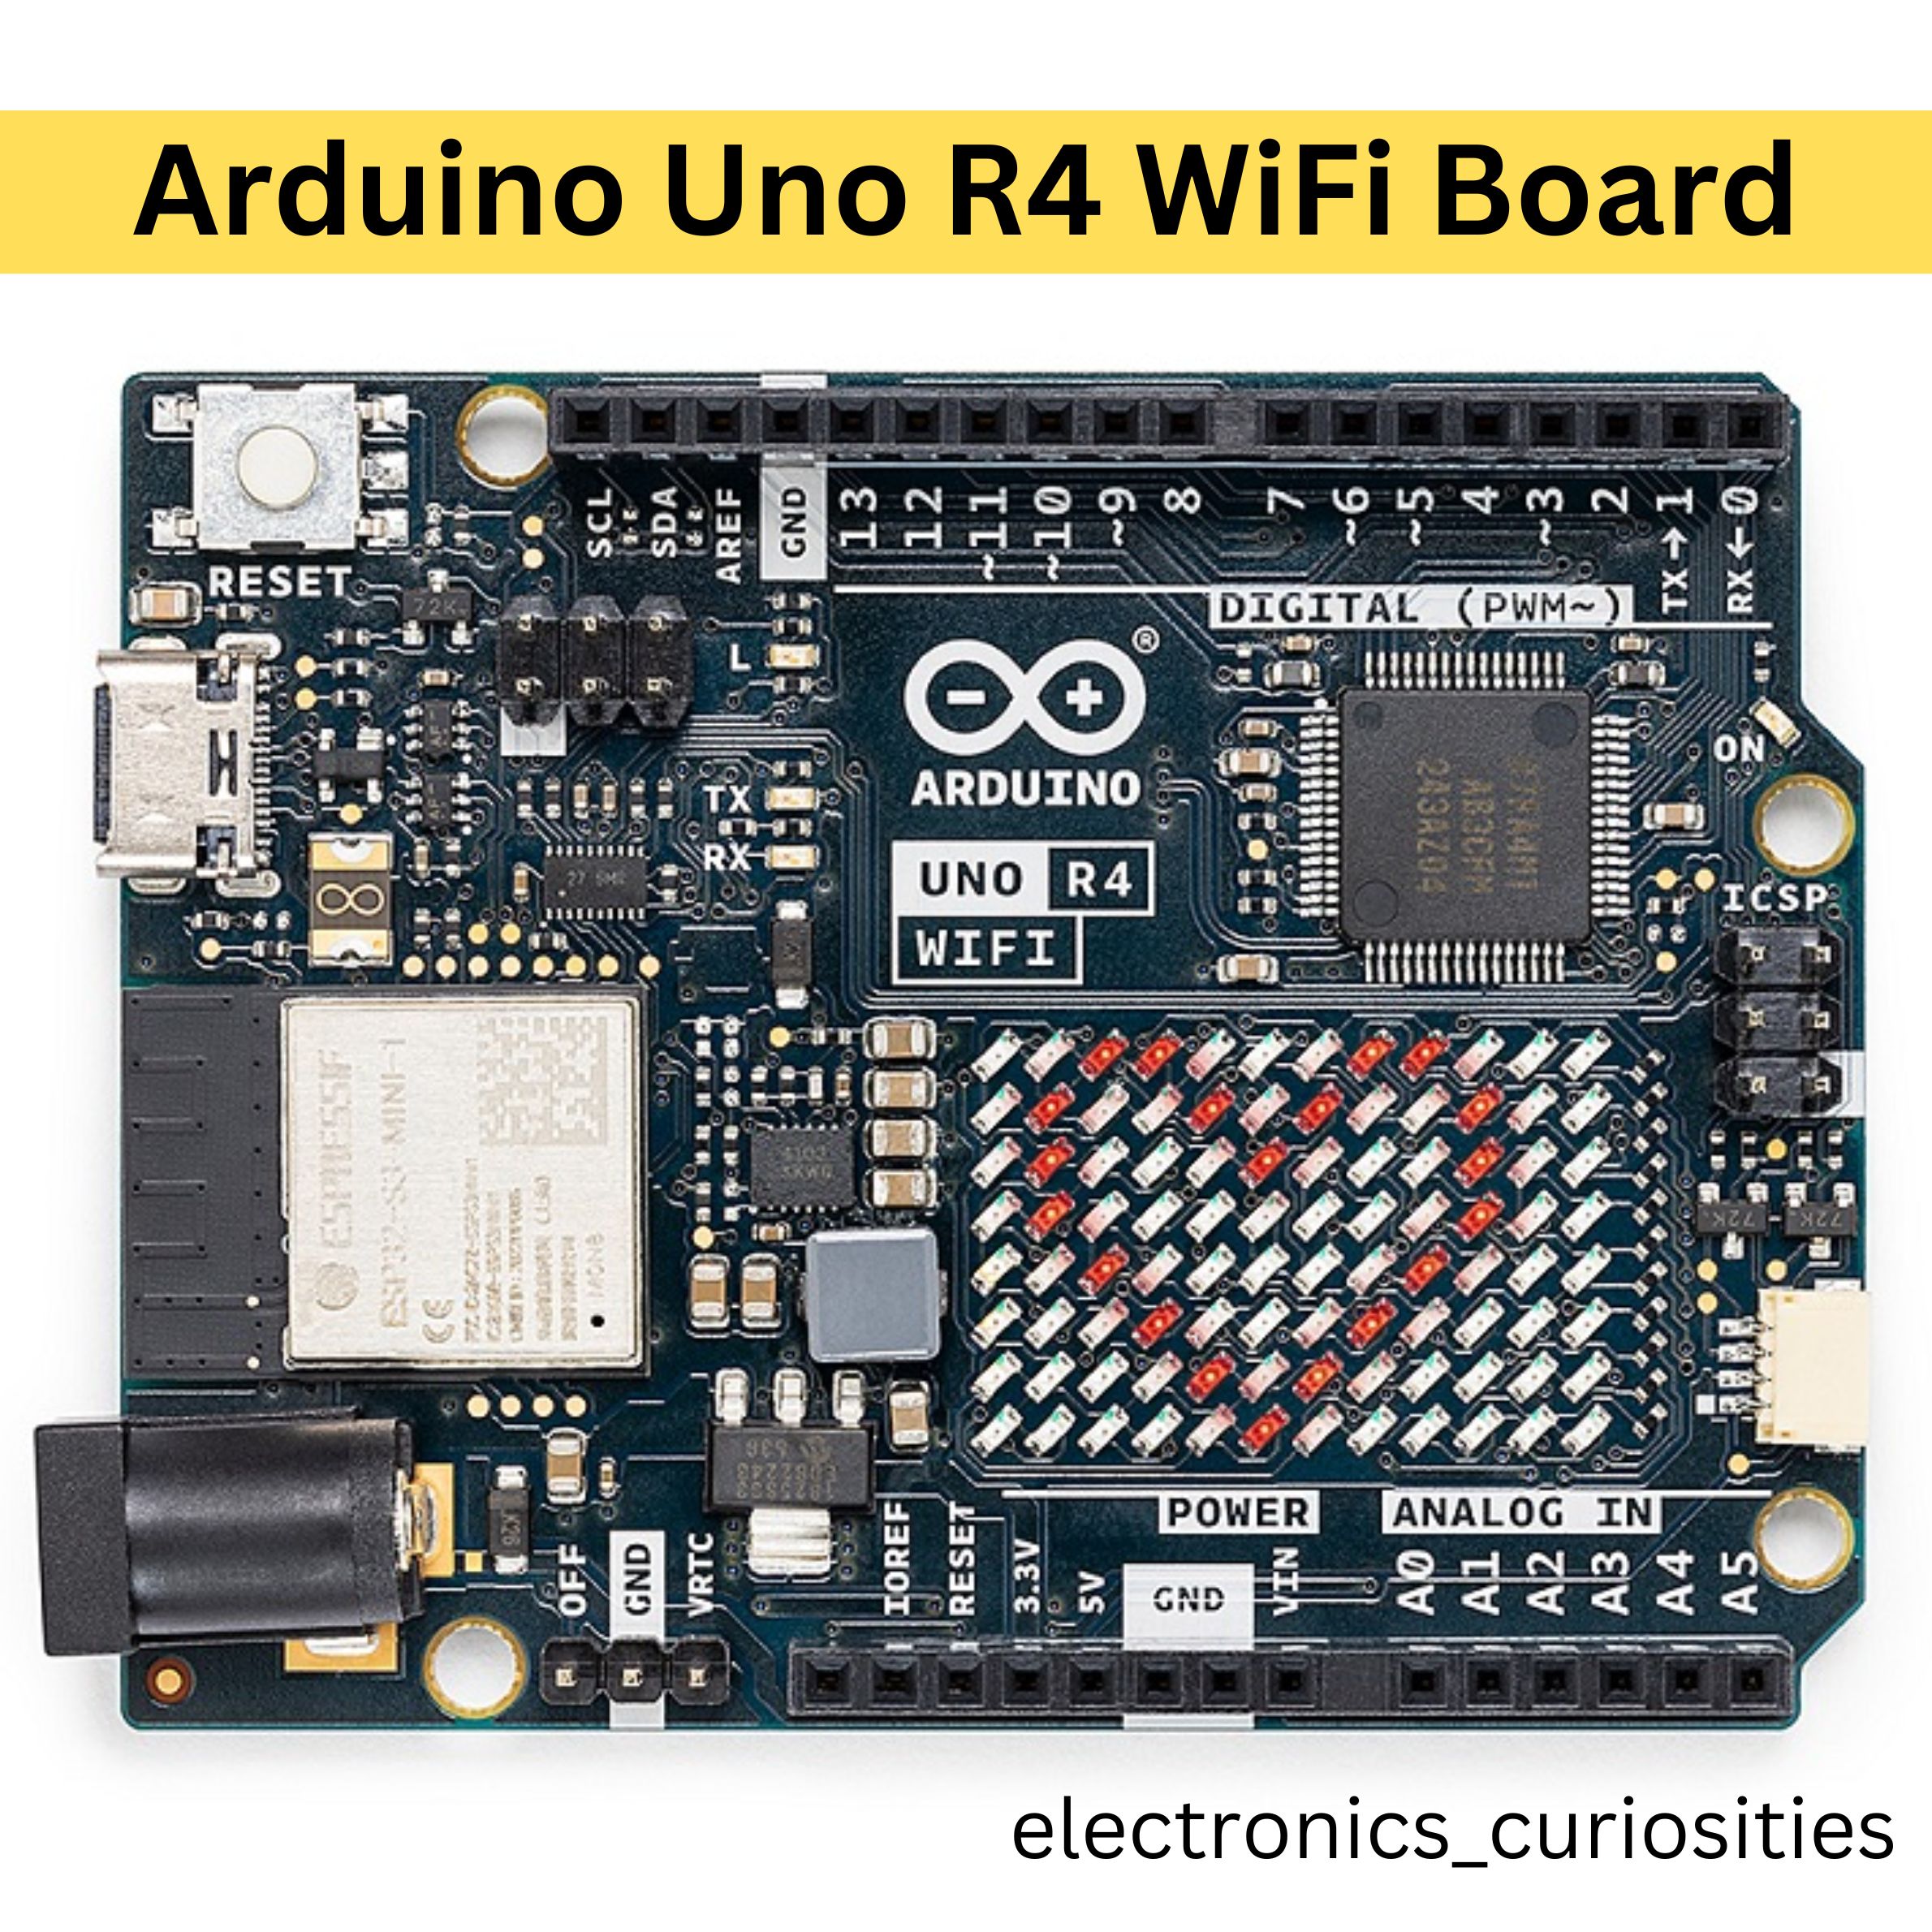
Introducing the latest addition to the Arduino lineup, the Arduino UNO R4 WiFi board. This new version of the UNO board brings significant advancements, making it a powerful tool for your projects. The standout feature of the UNO R4 WiFi is the integration of an ESP32-S3 Wi-Fi module (ESP32-S3-MINI-1-N8) which equip the UNO with Inbuilt Bluetooth and WiFi.
The UNO R4 WiFi is part of the first UNO series of 32-bit development boards, being previously based on 8-bit AVR microcontrollers. There are thousands of guides, tutorials, and books written about the UNO board, where the UNO R4
WiFi continues its legacy.
Powered by a 48 MHz Arm® Cortex®-M4 microprocessor, the board utilizes a RA4M1 series microcontroller from Renesas (R7FA4M1AB3CFM#AA0). With enhanced memory capabilities, the UNO R4 WiFi boasts 256 kB flash, 32 kB SRAM, and 8 kB of EEPROM. Additionally, a logic level translator (TXB0108DQSR) facilitates seamless communication between the RA4M1 and ESP32-S3 modules, ensuring optimal performance. Upgrade to the Arduino UNO R4 WiFi and experience the next level of Arduino innovation.
Integrated WiFi Module
As mentioned earlier, the built-in WiFi module is the standout feature of the Arduino Uno R4 WiFi board. It simplifies the hardware setup and reduces the need for additional components, making it easier for beginners to get started with wireless communication and IoT projects.
Updated Microcontroller
The Arduino Uno R4 WiFi board utilizes the ATmega4809 microcontroller, which offers improved performance compared to the ATmega328P used in the Arduino Uno. The ATmega4809 has more memory, additional I/O pins, and enhanced peripherals, providing greater flexibility and capabilities for your projects.
Enhanced Power Management
The power management system of the Arduino Uno R4 WiFi board has been optimized to improve energy efficiency. It allows you to operate your projects for longer durations on battery power, making it suitable for portable and low-power applications.
- Same form factor as UNO R3
- Inbuilt Wi-Fi and Bluetooth
- Onboard 12×8 LED Matrix
- Extra onboard peripherals
- Inbuilt HID Support
- Expanded Memory and Faster Clock Speed than before
Features:
- The UNO R4 is now a 32-bit Microcontroller board, being previously based on 8-bit AVR
- The board features 14 digital I/O ports, 6 analog channels
- Dedicated pins for I2C, SPI, and UART connections.
- It has a significantly larger memory:
- 8 times more flash memory (256 kB)
- 16 times more SRAM (32 kB).
- Fastest 48 MHz clock Speed. It is 3x faster than its predecessors.
- Onboard ESP32-S3 module for Wi-Fi & Bluetooth connectivity,
- Onboard 12×8 LED matrix
- Making one of the most visually unique Arduino boards to date.
- The LED matrix is fully programmable, where you can load anything from still frames to custom animations.
Frequently Asked Questions on Arduino Uno R4 WiFi Board(FAQs)
Q1) What is the difference between Arduino Uno and Arduino Uno R4 WiFi?
The Arduino Uno R4 WiFi board is an enhanced version of the Arduino Uno, with the addition of built-in WiFi connectivity. While both boards share the same form factor and microcontroller, the WiFi module in the Arduino Uno R4 WiFi allows for wireless communication and IoT capabilities.
Q2) Can I use shields with the Arduino Uno R4 WiFi board?
Yes, the Arduino Uno R4 WiFi board maintains compatibility with the wide range of Arduino shields available in the market. You can seamlessly connect and use shields to expand the functionality of your projects.
Q3) Does the board support both 2.4 GHz and 5 GHz WiFi networks?
A3: Yes, the built-in WiFi module on the Arduino Uno R4 WiFi board supports both 2.4 GHz and 5 GHz bands, providing flexibility in connecting to available networks.
Q4) Can I create a custom WiFi access point with the Arduino Uno R4 WiFi board?
Yes, you can create your own WiFi access point using the Arduino Uno R4 WiFi board. This allows other devices to connect directly to the board for data exchange or control purposes.
Q5) What programming language does the Arduino Uno R4 WiFi board use?
The Arduino Uno R4 WiFi board is programmed using the Arduino programming language, which is based on C/C++. It provides a simplified syntax and a rich set of libraries to interact with the board's features.
Q6) Can I power the Arduino Uno R4 WiFi board using batteries?
The board does not have a dedicated battery connector. However, you can power it using batteries by connecting them to the appropriate power pins or using an external power supply that supports battery inputs.
Q7) Are there any alternatives to the Arduino Uno R4 WiFi board with more advanced features?
Yes, there are other microcontroller boards available with more advanced features, such as the ESP8266 and ESP32, which offer higher processing power, more memory, and additional functionalities.
Q8) Can I use the Arduino Uno R4 WiFi board without WiFi functionality?
Yes, you can still use the Arduino Uno R4 WiFi board like a regular Arduino Uno without utilizing the WiFi capabilities.
Q9) Can I add external WiFi modules to the Arduino Uno R4 WiFi board for extended range or dual-band support?
Yes, you can add external WiFi modules to the board if you require an extended range or dual-band WiFi support.
Q10) Are there any limitations on the number of devices I can connect to the Arduino Uno R4 WiFi board?
The number of devices you can connect depends on the specific WiFi network and protocol you are using. Generally, the board can support multiple connections, but keep in mind the processing and memory limitations of the microcontroller.
Q11) Can I use the Arduino Uno R4 WiFi board for industrial or commercial applications?
The Arduino Uno R4 WiFi board is primarily designed for prototyping and hobbyist projects. For industrial or commercial applications, you may need to consider more robust and specialized microcontroller boards.
Q12) Can I program the Arduino Uno R4 WiFi board using the Arduino IDE?
Yes, the Arduino Uno R4 WiFi board can be programmed using the Arduino IDE, making it compatible with the extensive Arduino library and vast community resources.
Conclusion
The Arduino Uno R4 WiFi board combines the power and flexibility of the Arduino platform with built-in WiFi connectivity, opening up a world of possibilities for IoT projects. With its extensive compatibility, ease of use, and wireless capabilities, this board empowers creators to build innovative and connected systems. From home automation to remote monitoring, the Arduino Uno R4 WiFi board is a valuable tool for turning ideas into reality.
Thank You!
Have A Great Day!
Happy Learning!


